adobe flash
adobe media encoder
mpeg streamclip- download here for free http://www.squared5.com/
scene setup http://www.megaupload.com/?d=9P61IIZS
bg
character
leica
1) open scene setup

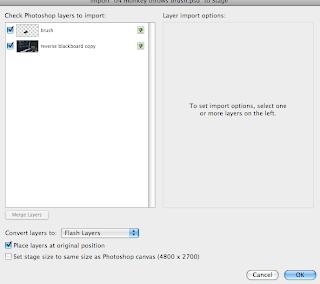
2) go to file-import-import to stage
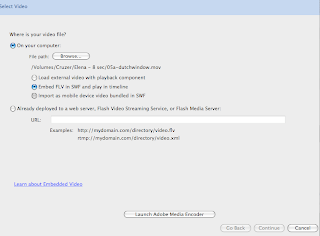
select your leica mov
3) press embed flv in swf and play in timeline
then click Launch adobe media encoder
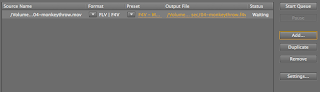
4) click add and then start queue
it will then convert it
5) complete step 2 again (go to file-import-import to stage) but this time with your new flv file
select new flv file and click embed flv in swf and play in timeline once again
6) click continue-continue-finish
now you have the leica
7) resize it o fit the work area (you may have to skew it)
8)then you can copy frames of the leica
and double click on the scene to take you in
paste frames of leica on leica layer (also paste this in monkey build)
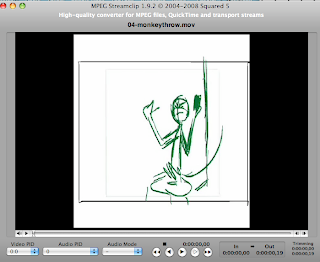
9) to get audio, open the leica file with mpeg stream clip
select your leica mov
3) press embed flv in swf and play in timeline
then click Launch adobe media encoder

4) click add and then start queue
it will then convert it

5) complete step 2 again (go to file-import-import to stage) but this time with your new flv file
select new flv file and click embed flv in swf and play in timeline once again
6) click continue-continue-finish
now you have the leica
7) resize it o fit the work area (you may have to skew it)
8)then you can copy frames of the leica
and double click on the scene to take you in
paste frames of leica on leica layer (also paste this in monkey build)
9) to get audio, open the leica file with mpeg stream clip

10) go to file-export audio
click ok and save
click ok and save

11) go back to flash and import sound
12) cut down scene to where the sound clip ends
13) then import bg to stage
make sure you import all the layers needed
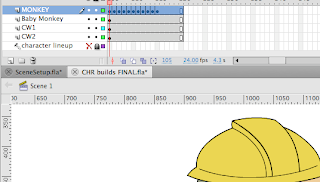
14)resize bg and props
15) convert any props or anything that needs to be animated to symbols
16) open the character build file and select the character. Then click copy frames and paste frames on the char1 layer in your scene setup
17) double click monkey to go inside build
18) select the position you need and alt+drag it to the second row of key frames at the beginning.
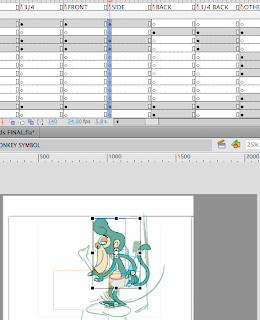
alt+drag the original the side
then shift drag the position you need to the beginning
19) make sure the looping is set to 1
20) now you can start animating!
12) cut down scene to where the sound clip ends

13) then import bg to stage
make sure you import all the layers needed

14)resize bg and props
15) convert any props or anything that needs to be animated to symbols
16) open the character build file and select the character. Then click copy frames and paste frames on the char1 layer in your scene setup

17) double click monkey to go inside build
18) select the position you need and alt+drag it to the second row of key frames at the beginning.

alt+drag the original the side
then shift drag the position you need to the beginning
19) make sure the looping is set to 1
20) now you can start animating!
I hope this helps! If you have any problems feel free to ask.
Thanks Elena, this is great!
ReplyDeletethank you elena, this is awesome! you are godly.
ReplyDeleteNo problem guys :)
ReplyDeleteThanks Elena!!!! that helps a lot!!!! :')
ReplyDelete